• Hey Trainers! Be sure to check out Corsola Beach, our newest section on the forums, in partnership with our friends at Corsola Cove! At the Beach, you can discuss the competitive side of the games, post your favorite Pokemon memes, and connect with other Pokemon creators!
  • Due to the recent changes with Twitter's API, it is no longer possible for Bulbagarden forum users to login via their Twitter account. If you signed up to Bulbagarden via Twitter and do not have another way to login, please contact us here with your Twitter username so that we can get you sorted.

Unovia's Pokemon Red "Origins" Run

Log #20-Clearing the Rockets Out
  • Authors' Note:
    It's fitting that I am able to use the same title for the same log number on both my Silver Playthrough and my Red Run, isn't it?


    Time to go after the Rockets in Celadon. I was surprised to see them controlling the Game Corner. My Team to go after the Rockets was:
    Charmeleon (Level 32)
    Pidgeotto (Level 31)
    Machoke (Level 30)
    Jolteon (Level 29)
    Kadabra (Level 28)
    Onix (Level 27)


    The Team Rocket HQ was a very tough location, mainly due to the Warp Panels! If you are familiar with any of my other playthroughs with Warp Panels, you will remember that I HATE them with a PASSION! I managed to get through without a guide or video, which I was impressed by. At a point in the take down, I got the Moon Stone and the Nugget. I left for a moment to finally evolve my Jigglypuff to Wigglytuff, cash in the Nugget, then I started up again. Every time I got a TM, I would leave to put it in my PC, then come back.

    There are 11 Rockets here, which provided a lot of good training. The goal here is to get the Silph Scope so we can go to the Pokemon Tower. The Silph Scope allows one to see the Ghosts. I also had to pick up the Lift Key to access the Elevator, which eventually got me to Giovanni. Every member of my team except Onix (who literally was no help here, since his Rock Throw is so inaccurate) gained a Level through the battles.
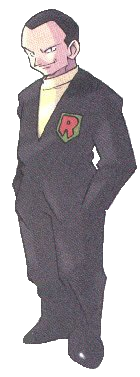
    1481588-red_blue_giovanni.png

    Now is the time to take the boss down! I used Machoke (Level 31) for the entire fight. He sent out Onix (Level 25) first, which died to a Low Kick. He then sent out his Rhyhorn (Level 24), which suffered the same fate. Lastly was her Khangaskhan (Level 29), which hit me with Comet Punch. Two Low Kicks beat it down. Giovanni was a pushover, and as he departed, left me with the Silph Scope. I escape Roped out, deposited Onix, when dropped off the Lift Key into the PC.

    What will we be doing now? We could take on Erika now, but I think we will head back to the Pokemon Tower now and take care of some unfinished business. Time to rescue Mr. Fuji and collect some ghosts. In the next Log, we will do just that. Until next time, we will see you!
     
    Log #21-I Ain't Afraid Of No Ghosts!
  • With the Silph Scope in hand, I headed to the Poke Mart to pick up a Poke Doll (you will see why later), then headed back to Lavender Town, entering the Pokemon Tower. My first issue was battling Blue, who was waiting for me. He sent out Pidgeotto (Level 25) first, and I sent out Charmeleon (Level 33). A few Embers took it out. I then switched to my own Pidgeotto (Level 32) to take out his Growlithe (Level 23) and Exeggcute (Level 22). The Growlithe liked to Ember me, but overall wasn't a problem. Exeggcute went down easy to Wing Attack. When he sent out Kadabra (Level 20) and Wartortle (Level 25), my Jolteon (Level 29) easily took them both out with Thunderbolt. Defeated, Blue mentioned the Mother Marowak, then departed. The coward didn't want to help me!

    As I climbed the Tower, battling Channelers, I captured a Gastly (Level 20) and Cubone (Level 20), which I deposited into the PC and sold off the Nugget and a few unnecessary items. With that done, I came back and finished. On the 5th Floor, there is a healing pad. Make sure to take advantage of it!

    Literal Ghost.jpg


    On the 6th Floor, there was the Ghost of Marowak (Level 30), trying to force me to leave. Earlier, I had purchased a Poke Doll from Celadon Department Store, which allowed me to exploit a glitch where I could use the doll to make the ghost disappear. Marowak was calmed, then departed. I liked the scene in Origins and the scene in Pikachu & Eevee for this. Being free to climb further, I took on some more Team Rocket Grunts to free Mr. Fuji. Grateful, he took me back to his house and gave me the Poke Flute, which can be used to wake some sleeping Pokemon.

    Tower complete, I decided to box Machoke so I could get Gastly and Cubone in my team. What will I do now? Well, first, I am going to train Gastly and Cubone to Haunter (Level 25) & Marowak (Level 28), then I think I will go take on Erika for my next Badge. Until the next time, we will see you!
     
    Log #22-Erika (Gym #4)
  • With Cubone and Gastly, I spent some time training them up. In Generation 1, abilities didn't exist (they wouldn't until Generation 3, sorry Fire red & Leaf green fans!), so I could use Ground moves on the Gastly and Haunter in the Tower. If you want to train a Gastly in Gen 1, Lick is the best move against the other Ghost Types here. Anyway, I got them up to Haunter & Marowak, then left the Tower, boxed them, and moved on (I know Red used Haunter in his battle against Sabrina and also as a Gengar against Mewtwo, but that was Generation 3 Red, where Haunter & Gengar had actual attacking moves, not Generation 1, where it had none). With that done, I headed to Celadon for the Gym Battle.

    275-2754243_pokemon-gym-leader-erika-hd-png-download.png


    For the battle against Erika, I had the following Pokemon:
    Charmeleon (Level 34)
    Pidgeotto (Level 33)
    Kadabra (Level 30)
    Parasect (Level 24)-Only for Cut

    With Erika, it was important to have a Pokemon that had Cut. I had two options, both of which were in the PC..Vileplume & Parasect. Of the two, I felt it was better to use Parasect. There is a tree in the backside of the Gym and 3 trees within the Gym itself. I defeated the trainers pretty easily (By the end, Pidgeotto was Level 34 and Kadabra was Level 32). I wanted to save Charmeleon for Erika herself.

    She opened with Victreebel (Level 29) against my Kadabra (Level 32). Kadabra used Psybeam, and Victreebel tried to use Wrap. When that failed, it fell to another Psybeam. Erika switched to Tangela (Level 24), and I changed to Pidgeotto (Level 34). Tangela used one Constrict, then fell to two Wing Attacks. Down to her last Pokemon, she sent out Vileplume (Level 29) and I sent out Charmeleon (Level 34) to mirror the battle in Origins:

    320px-Erika_Vileplume_PO.png


    Vileplume was a bit bulkier than I expected, being able to counter my Ember attacks with Petal Dance, but after 3 hits, Vileplume fell, winning me the 4th Badge. After I beat the Gym, I added Jolteon to my Team, since I decided to hunt down the two Snorlaxes (we will go catch them in the next Log).

    Silence Bridge.jpg


    First, I headed to Lavender Town, then traveled south onto Silence Bridge. Jolteon had a picnic here, since all of the trainers here were fishermen and had Water types. As soon as I ran into Snorlax, I headed back to Celadon. Heading west, I traveled onto Route 16, where I saw the other Snorlax. In the grass, I also captured a Doduo (Level 20).

    600px-143Snorlax.png


    In the next Log, it's Snorlax time! Until the next time, we will see you!
     
    Log #23-The Two Snorlaxes
  • 600px-143Snorlax.png

    Ah, Snorlax. The cuddly sleep specialist. To be honest, I wasn't sure how I wanted to approach these sleeping monsters. These things can be intimidating and hard to capture. Both the Route 12 and Route 16 are Level 30, nearly matching my team. To prepare, I bought 6 Great Balls, bringing my Great Ball count to 11. I would need all I bought for these captures.

    Silence Bridge.jpg


    Route 12, otherwise known as Silence Bridge, was the first one I woke up. It was a slow fight, but it took 3 Great Balls to capture. I mostly used Kadabra to weaken and capture it, though Snorlax almost fainted. It held on by a thread until it was captured.

    Moving onto Route 16, which was west of Celadon, I woke the second one up. Unfortunately, I had forgotten to heal up my team, thinking I could catch Snorlax quickly. As a result, the second Snorlax beat Kadabra. I ended up sending out Charmeleon, who held his own. On the 3rd Great Ball, with the Snorlax asleep, I caught it. I was amazed to get both of them. One will be in my final team, while the other will remain in the box. Not sure which one I want to use, since they are the same.

    Before I move on, I will train up my Doduo to a Dodrio and Snorlax to the rest of my team. I think I will get Pidgeotto to Pidgeot and put Kadabra into the Box, which will reorganize my Team. By the next Log, my Team will be:

    Charmeleon
    Jolteon
    Snorlax
    Dodrio

    In the next Log, we will take on Routes 16, 17, & 18 on the way to Fuchsia City. Until then, we will see you!
     
    Log #24-The Two Roads To Fuchsia (Routes 16-18) & (Routes 13-15)
  • Routes 16-18
    Before I traveled on Route 16, I finished training Doduo to Dodrio and I figured Snorlax could manage to level up itself. I took the one that I got on Route 16, which had higher stats than the other one. I named the one from Route 12 Silence and the Route 16 one Heartbreak. This was my Team as I started on Cycling Road (Route 16):
    Charmeleon
    Pidgeotto
    Jolteon
    Snorlax (Heartbreak)
    Dodrio


    There were a lot of bikers on Routes 16 & 17 (16 Total) and there were 3 Birdkeepers on Route 18. By the end of the three Routes, all of my team was Level 35. In order to finally put Pidgeotto in the box, I took some time in the grass to level it up. At the end of Route 18, there was Fuchsia City. After I healed up, I thought maybe I would tackle the other Route to Fuchsia, the one heading from Lavender Town.

    Routes 13-16
    Heading from Lavender Town, I biked across Route 12, collecting the Super Rod.
    Super_Rod_XYORAS.png

    After I found a patch of grass and a cuttable tree on Route 13, I decided to explore it, managing to capture Venonat (Level 26). Strangely, I experienced more Poisoning on Routes 13, 14, & 15 than I had on the other 3 Routes! On Route 14, Charmeleon evolved to Charizard! By the end of the exploration of these 6 Routes, my team was between Levels 37 & 38. I also didn't know you could get Ditto here, so I will be catching that by the next Log. I will also be evolving Venonat into Venomoth (Level 31).

    Now that we have arrived at Fuchsia City from both directions and have a new Rod, we will be fishing in the next Log. Until the next time, we will see you!

    Current Dex
    Charizard
    Butterfree
    Beedrill
    Pidgeot
    Raticate
    Fearow
    Arbok
    Raichu
    Nidoqueen
    Nidoking
    Clefable
    Wigglytuff
    Golbat
    Vileplume
    Parasect
    Venonat
    Dugtrio
    Primeape
    Arcanine
    Kadabra
    Machoke
    Graveler
    Farfetch'd
    Dodrio
    Haunter
    Onix
    Hypno
    Marowak
    Mr. Mime
    Gyarados
    Jolteon
    Snorlax
     
    Log #25-Fishing With The Super Rod
  • Super_Rod_XYORAS.png
    Before I went fishing with the Super Rod, I biked back to Route 13, where I proceeded to capture a Ditto. Unfortunately, the blob like Pokemon can't be really used in Gen I, where most of its features involve breeding (first seen in Gen II).

    I then went to the Lavender Town Poke Mart, where I bought many Great Balls to make this fishing experience easy. I also took Venonat, since most of the Water Types I would be catching would be low level.

    Let's go fishing! Which monsters did I catch?

    Psyduck
    Poliwag
    Tentacool
    Shellder (quickly evolved with a Water Stone to Cloyster)
    Krabby
    Goldeen


    With these additions, it brought my catch count to 74 Pokemon. Most of the other "Fishables" can't be caught without going into new areas or getting Surf. As I close out this Log, I got my Venonat to Venomoth, totally bringing my list to 75.

    Where will I train the new Water Types? Most of them, if they have Water moves, will be trained in Diglett's Cave. It will take a bit, but where will we be going next? I think we will be opening up Saffron City and see what is there.

    Until the next Log, we will see you!

    Current Dex:
    Charizard
    Butterfree
    Beedrill
    Pidgeot
    Raticate
    Fearow
    Arbok
    Raichu
    Nidoqueen
    Nidoking
    Clefable
    Wigglytuff
    Golbat
    Vileplume
    Parasect
    Venomoth
    Dugtrio
    Psyduck
    Primeape
    Arcanine
    Poliwag
    Kadabra
    Machoke
    Tentacool
    Graveler
    Farfetch'd
    Dodrio
    Cloyster
    Haunter
    Onix
    Hypno
    Krabby
    Marowak
    Goldeen
    Mr. Mime
    Gyarados
    Ditto
    Jolteon
    Snorlax
     
    Log #26-Saffron City
  • 314px-Saffron_City_HGSS.png
    I was able to get all but Psyduck which brought my caught Pokemon total to 80. Psyduck is a REALLY HARD POKEMON TO TRAIN due to the fact that it doesn't learn a major move until Level 31, so I gave it Water Gun to try to raise it. When that didn't work, I decided to move on for now.

    Flying back to Celadon, I bought a Lemonade for the Saffron Guards, then went through the gate. Grateful, they let me into Saffron City. What is there to do here?
    1. The Fighting Dojo (Log #27)
    2. Silph Co. (Log #28)
    3. Saffron City Gym (Log #31)

    Until the next time, we will see you!

    Current Dex:
    Charizard
    Butterfree
    Beedrill
    Pidgeot
    Raticate
    Fearow
    Arbok
    Raichu
    Nidoqueen
    Nidoking
    Clefable
    Wigglytuff
    Golbat
    Vileplume
    Parasect
    Venomoth
    Dugtrio
    Psyduck
    Primeape
    Arcanine
    Poliwrath
    Kadabra
    Machoke
    Tentacruel
    Graveler
    Farfetch'd
    Dodrio
    Cloyster
    Haunter
    Onix
    Hypno
    Kingler
    Marowak
    Seaking
    Mr. Mime
    Gyarados
    Ditto
    Jolteon
    Snorlax
     
    Log #27-The Fighting Dojo
  • The Fighting Dojo was, at one time, a Fighting Type Gym, until Sabrina, the Saffron City Gym Leader, battled and defeated the Gym. There are only 5 trainers here, all Black Belts. They were easy to defeat using Dodrio. Upon defeating them, I took Hitmonlee as my reward.

    Why did I pick Hitmonlee? We know that in Origins Red had Hitmonlee as part of his team at a later point, and we don't know how he got the information for Hitmonchan (probably through a trade and trade back situation). Both Hitmons come in at Level 30, so it won't take too long to get it to the rest of the team. In the next Log, we will go after the Silph Co. There are quite a few Rockets around town, and I wouldn't be surprised if they have something going on there.

    Until the next time, we will see you!
     
    Log #28-Silph Co.
  • Silph Co. was an extreme challenge. I did this in 3 shifts. It was time to beat the Rockets down!

    320px-Silph_Company_PO.png


    Shift 1: Clear All Trainers Without the Card Key
    Shift 2:Clear All Trainers With The Card Key
    Shift 3:Beat Boss Rocket (Giovanni)


    We are going to discuss all 3 parts in 3 Headings. Let's go!

    Shift 1: Clear All Trainers Without the Card Key
    While the Card Key is vital in this occasion, for this part, there were quite a few trainers we could battle without the Card Key. There are 30 Grunts & Scientists that can be fought total. For this part, I had Psyduck (Level 21) in my Team to show up and soak up the Experience Points. By the end of this shift, Psyduck was Level 31, almost ready to evolve. I took a little bit and went back to Diglett's Cave to finish turning Psyduck into Golduck, which was then boxed. That got me to Number 82 Caught.

    Shift 2: Clear All Trainers With the Card Key
    On Floor 5F, with the Card Key now in my possession, I opened all of the locked doors, battling the trainers as needed. Eventually, I found Blue, who battled me instead of taking on the Rockets. Just whose side is he on? He opened with Pidgeot (Level 37) and I did with Dodrio (Level 39). One Drill Peck ended that fight. Charizard (Level 40) took out Growlithe (Level 38), Exeggcute (Level 35) and Alakazam (Level 35) in short order. Finally came his big bad Blastoise (Level 40). My Jolteon (Level 40) just crushed it. Blue left, and I collected Lapras (Level 15) as a reward.

    Shift 3:Beat Boss Rocket
    I found myself outside the office of the Silph Co. President. Opening the door with the Card Key, I came face to face with Giovanni.

    1481588-red_blue_giovanni.png

    Jolteon easily beat his Nidorino (Level 37) and Khangaskhan (Level 35). I switched to Hitmonlee for Rhyhorn (Level 37) and Snorlax for Nidoqueen (Level 41). He was not that hard to defeat at all! He left, and I got the Master Ball. Interestingly, in Origins, Red actually lost to Giovanni here, which stopped him from getting access to the Master Ball. The Rockets left Saffron, freeing the city. I will be taking some time to train Lapras to the rest of my team then we will be moving on. In the next Log, we will be going back to Fuchsia to battle Koga for the 5th Badge!

    Until the next time, we will see you!
     
    Log #29-Koga (Gym #5)
  • I quickly got Lapras to Level 38, where it learned Ice Beam, then decided to go take on Koga. This was my Team going into the Gym:
    Charizard (Level 41)
    Jolteon (Level 40)-Got to Level 41
    Snorlax (Level 40)-Got to Level 41
    Hitmonlee (Level 40)
    Lapras (Level 38)-Got to Level 40
    Dodrio (Level 40)

    Koga.jpg


    I used Lapras to beat most of the trainers here, allowing me to get it to Level 40. I used Jolteon to finish the trainers off, getting it to Level 41. Curiously, there were several trainers who switched out their Pokemon during battle. The "invisible walls" of the Gym are very challenging, but if you look at the dashed areas, you can figure out the way to go into the center of the room, where Koga waits. Koga opened with Koffing (Level 37) and I opened with Snorlax (Level 40), which OHKOed Koffing. Next was his Muk (Level 39), which was a bit of a troublesome battle, especially since Muk used Poison Gas against Snorlax. I put Snorlax to sleep using Rest, then woke it up using the Poke Flute (That item is so very helpful!). Even though Muk used Sludge, Snorlax finished with Body Slam. Snorlax also beat the other Koffing (Level 37) with Body Slam, getting to Level 41.

    Snorlax had beaten 3 Pokemon, and I thought Snorlax had done a lot, so I decided to switch to Hitmonlee (Level 40) for Weezing (Level 43), thinking that Hitmonlee could go after Weezing, kicking it like a soccer ball. Changing out was a mistake, as Weezing was boosted by two X Attacks, easily beating Hitmonlee using a Sludge attack. I then sent out Lapras (Level 40). A single Ice Beam took down Weezing, ending the battle and winning me my 5th Badge.

    In the next Log, we will go into the Safari Zone, where we will be trying to get the Gold Teeth, Surf, and Strength. Until the next time, we will see you!
     
    Log #30-Safari Zone
  • Here we go! The Kanto Safari Zone is the most frustrating part of the game, mainly because it is really tricky to catch anything there! I was there to find the Gold Teeth, Surf, & Strength. There are the following monsters in the Safari Zone:
    Exeggcute
    Slowpoke
    Rhyhorn
    Chansey
    Scyther
    Kangaskhan
    Dratini
    Dragonair

    It was a major trek, but I managed to get Exeggcute, Slowpoke, & Rhyhorn before time expired. I saw Dratini a few times, a Kangaskhan, and no Scyther. I gave Snorlax Strength and Lapras Surf. The Warden got his teeth. Flying back to Celadon, I evolved Exeggcute to Exeggutor.

    In the next Log, we will take on Sabrina for the 6th Badge. Until the next time, we will see you!
     
    Log #31-Sabrina (Gym #6)
  • Before I went to battle Sabrina, I completed a few actions. First, I fished up a Poliwhirl in Celadon City.

    Second, I trained up Slowpoke north of Vermillion City, finishing it up in the Pokemon Tower, evolving it to Slowbro.

    Third, before I went to the Saffron Gym, I collected Psychic from Mr. Psychic, giving it to Lapras.

    These actions allowed me to:
    Trade Poliwhirl for Jynx in Cerulean City and Slowbro for Lickitung in the Route 18 gateway. Following those actions, I set up to take on Sabrina. Let's Go!

    My Team for this Gym was:
    Charizard (Level 41)
    Jolteon (Level 41)
    Snorlax (Level 41)
    Hitmonlee (Level 40)-Got it to Level 41 in the Gym
    Lapras (Level 40)-Got it to Level 41 in the Gym
    Dodrio (Level 40)-Got it to Level 41 in the Gym

    Sabrina.jpg


    The Warp Tiles were difficult, but they allowed me to travel around and train more, getting me ready for Sabrina. Surprisingly, I was able to use Charizard (Level 41) in the entire fight. Sabrina opened with Kadabra (Level 38). Curious, I tried Ember, which barely did anything. Kadabra used Psybeam, which did some damage. Switching tactics, I Slashed it, leading to a fainting of Kadabra. Next was Mr. Mime (Level 37), who liked to use Confusion. One Slash took it down. Next came Venomoth (Level 38). Why would she have a Venomoth? There are plenty of Psychic Types in the game, some of which are shown by her trainers. It makes no sense! Anyway, Venomoth used Poison Powder, which Poisoned Charizard, but Charizard took Venomoth down with Ember. Charizard was weakened, but still able to battle. As her final Pokemon, Sabrina sent out Alakazam (Level 43), who was hit by a Slash that almost took it out. Hanging on, Alakazam used Psywave, which, combined with Poison chip damage, almost defeated Charizard. With one final Slash, Alakazam fell, winning me the 6th Badge. Was a bit surprised she didn't stall out by using Recover on Kadabra and Alakazam or use a Screen & Barrier strategy.

    Oh well, I now have 6 Badges. I also used a Full Heal to remove the Poison damage so I could get out of the Gym safely. In the next Log, we will go through Routes 19, 20, & do some captures in the Seafoam Islands. Until the next time, we will see you!

    I have not given you a Pokedex Update in a few posts (since Log #26), though I have hinted at some of it, but here we go!
    Current Dex

    Charizard
    Butterfree
    Beedrill
    Pidgeot
    Raticate
    Fearow
    Arbok
    Raichu
    Nidoqueen
    Nidoking
    Clefable
    Wigglytuff
    Golbat
    Vileplume
    Parasect
    Venomoth
    Dugtrio
    Golduck
    Primeape
    Arcanine
    Poliwrath
    Kadabra
    Machoke
    Tentacruel
    Graveler
    Slowbro
    Farfetch'd
    Dodrio
    Cloyster
    Haunter
    Onix
    Hypno
    Kingler
    Exeggutor
    Marowak
    Hitmonlee
    Lickitung
    Rhyhorn
    Seaking
    Mr. Mime
    Jynx
    Gyarados
    Lapras
    Ditto
    Jolteon
    Snorlax
     
    Log #32-Routes 19, 20, & Seafoam Islands
  • Flying from Saffron to Fuchsia City, I traveled south to Route 19. Before I went on Lapras and headed out, I fished up Staryu (evolved it in Celadon) and Horsea. With those captures, I set sail, battling many trainers on the way to the Seafoam Islands. This gave a lot of experience and some quick money. Eventually I arrived at the Seafoam Islands.

    Seafoam Islands.png


    In this pair of islands, there is only one new capture we will be focusing on right now, though deep in the caves is Articuno, the Titan of Ice. We will be back for that. For now, we captured a Seel, with the intention to move on. I got confused as to where to go from here...how to get to Cinnabar. For those who don't know themselves, here is the video.

    In the next Log, we will be heading back home and heading out to Cinnabar Island, with a focus on the Pokemon Lab & the Pokemon Mansion. Until the next time, we will see you!
     
    Log #33-Cinnabar: The Lab & The Mansion
  • Sailing south from Pallet Town, I took on a few battles, then arrived at Cinnabar Island.

    Cinnabar Island.jpg


    I decided to go to the Cinnabar Mansion first, but right now, it was only to catch a few new captures. These were Ponyta, Grimer, & Koffing. Once I caught them, I left, choosing to come back later once a bunch of new captures are trained up. Wanting to get my Fossil & Amber turned into Pokemon, I did that as well, getting Kabuto & Aerodactyl. I will be going back to take on the Mansion eventually.

    Pokemon I Need To Train Currently:
    Rhyhorn (Up to Level 42)
    Horsea (Up to Level 32)
    Seel (Up to Level 34)
    Ponyta (Up to Level 40)
    Grimer (Up to Level 38)
    Koffing (Up to Level 35)
    Kabuto (Up to Level 40)

    Most of those Pokemon shouldn't take too long to train up. Right now, I am sitting at 99 Pokemon in the Dex Captured, and with these evolutions, I will be up to 106 Pokemon. The next Log will be a surprise as to what we will do. I don't want to spoil it for now. Until the next time, we will see you!
     
    Log #34-The Glitch Safari in Cinnabar
  • Missingno_s.png
    You might have noticed that in this playthrough, I have not really focused on the Kanto Safari Zone. Why is that? It's because of the crazy glitch known as Missigno. What is Missigno.? To put it simply, it is a bug in the coding of the Generation I games. With the Missigno Glitch, you can get infinaite items (as long as they are in your 6th slot of your bag) and more for this point, find rare Pokemon that you can't otherwise, such as the Safari Zone.

    How do you access the Missigno. Glitch? It involves the Old Man in Viridian City.

    Once I talked to the Old Man, I flew to Cinnabar Island, bought an Ultra Ball (I could have duplicated the Master Ball, but I still want to save it for Mewtwo), and allowed that to be duplicated to 128, along with Rare Candies. I used the Rare Candies to get some of my remaining Level Ups to evolve (Kabuto & Grimer).

    Using this glitch, I will be catching most of the Safari Zone Pokemon (not Dratini) from there. It will take me a bit to do it, but I will get it done.
    In the next Log, we will go to Route 21 and continue our quest. Until the next time, we will see you!
     
    Log #35-Route 21
  • 200px-Kanto_Route_21_HGSS.png
    Before I headed onto Route 21, I was able to catch Scyther (using Rare Candies to raise it), Tauros, Chansey, and Kangaskhan at the Cinnabar Island Glitch Safari Zone. Once those were captured, I deposited Hitmonlee (goodbye buddy) and moved Scyther into my Team. Red's Origins Team has now (mostly) been achieved.

    Those captures done, I actually went to Route 21. There is a single, large patch of grass in which I captured Tangela. My Pokemon Captures are now 111.Well, now that I have done all of this work, what is next? At Log #33, I had first arrived at Cinnabar Island, going into the Cinnabar Mansion to do captures and the Pokemon Lab. I had largely avoided exploration of the Mansion. In the next Log, we will finally explore the Mansion and get access to Cinnabar Gym.

    Until the next time, we will see you!
     
    Log #36-Taking On The Mansion
  • In Log #33, we had gone to Cinnabar Island, but had skipped the Mansion. Now at Log #36, we decided to clear the Mansion. This was a bit tricky to do so, mainly due to the statues that had to be pressed to open the doors. Most of the items were useless, but I did pick up a Rare Candy and the TMs for Blizzard & SolarBeam. Thankfully, I didn't get stuck, since there is a point where if you go around a table on the right side, the player character gets stuck, requiring the use of an escape rope. Why was that even a thing?! We managed to get through, collecting the Secret Key, which can be used to open the Cinnabar Gym. Why would anyone leave his keys in an old decrepit building?

    We did discover interesting journal entries for some kind of experiment that involved Mew and a new Pokemon called "Mewtwo". What the heck happened here? Was it a Lab in the past?

    Mewtwo.jpg


    Looks like we have a new Mystery on our hands. Just what was Mewtwo, and where is it now? In the next Log, we will be doing some more exploration, this time at the Cerulean Power Plant. Until the next time, we will see you!
     
    Log #37-Route 10 & The Power Plant
  • I flew to Cerulean City, gave Scyther Cut, then traveled east. I got confused for a bit, not sure what ledges to jump, but I eventually found the river that led to the Power Plant.

    Zapdos.jpg


    This place is the roost of Zapdos, but we are not interested in that right now, much like we were not interested in Articuno when we stopped at the Seafoam Islands. At this point, we decided to only gather what Pokemon we could. These encounters were:
    Magnemite, Voltorb, & Electabuzz. We will be back for Zapdos later. I have a ton of Rare Candies, so I used a few to get Magnemite to Magneton & Voltorb to Electrode. The rest of the Rare Candies I have will be going to Dratini when I get it. My current Dex Count is 116. In the next Log, we will be going and battling Blaine. Until the next time, we will see you!
     
    Log #38-Blaine (Gym #7)
  • My Team for the Gym:
    Charizard-Level 44
    Jolteon-Level 44
    Snorlax-Level 43
    Scyther-Level 43
    Lapras-Level 43
    Dodrio-Level 43

    Blaine.jpg


    Now with the Secret Key in our possession (we got it from the Mansion in Log #36), we walked into the Cinnabar Gym. This Gym has two ways to get to Blaine: Either Brawn (Trainer Battles) or Brain (the Quiz Questions). For the battle experience, I did answer the questions and battle the trainers. Unlike in other Generations, where you can't battle the trainers once you take on the quiz, in Gen I, you can. I did so, getting most of my Team to Level 44. I eventually got to Blaine, whose overworld sprite looked like a fat dude in a striped shirt. Lol.

    I opened with Lapras, and used it the entire fight. His Growlithe (Level 42), Ponyta (Level 40), and Rapidash (Level 42) all went down to single Surfs. His Arcanine (Level 47) was a bit bulkier. How the heck is there such a level discrepancy between his Arcanine and the rest of his party?! Anyway, he used Ember, and not seeing much result, used Fire Blast, which actually burned Lapras. Lapras hung in there, and a few Surf attacks finished Blaine. I now have 7 Badges.

    What will we be doing in the next Log? Hunting down Articuno & Zapdos. Until the next time, we will see you!

    Current Dex:
    Charizard
    Butterfree
    Beedrill
    Pidgeot
    Raticate
    Fearow
    Arbok
    Raichu
    Nidoqueen
    Nidoking
    Clefable
    Wigglytuff
    Golbat
    Vileplume
    Parasect
    Venomoth
    Dugtrio
    Golduck
    Primeape
    Arcanine
    Poliwrath
    Kadabra
    Machoke
    Tentacruel
    Graveler
    Rapidash
    Slowbro
    Magneton
    Farfetch'd
    Dodrio
    Dewgong
    Muk
    Cloyster
    Haunter
    Onix
    Hypno
    Kingler
    Electrode
    Exeggutor
    Marowak
    Hitmonlee
    Lickitung
    Weezing
    Rhydon
    Chansey
    Tangela
    Kangaskhan
    Seadra
    Seaking
    Starmie
    Mr. Mime
    Scyther
    Jynx
    Electabuzz
    Tauros
    Gyarados
    Lapras
    Ditto
    Jolteon
    Kabutops
    Aerodactyl
    Snorlax
     
    Log #39-Zapdos & Articuno
  • Dragonite.png
    Before I went to go after Zapdos (I did Zapdos first, since it was easier), I headed to the Safari Zone to see if I could fish up a Dratini so I didn't have to buy one at the Game Corner. It took some fishing, but I eventually caught one (threw a Rock, then started "Chuck & Pray), and I ended up catching it (Level 15)! Leaving the Safari Zone, I used some of my Rare Candies to take it all the way to Dragonite! Now my money can be saved for Porygon later. I sold all of my remaining Rare Candies for a nice profit (I had 37 left).
    Zapdos.jpg
    As I said, I went after Zapdos first because it was easier. I was able to find it in the back corner of the Power Plant. It was Level 50, slightly more than my Team (Level 44). Using Dodrio I was able to lower Zapdos to a manageable level (if you don't lower it, you can completely miss the Pokemon), then started "Chuck & Pray". Eventually I caught it. Named it Lightning. Time to go after Articuno.
    Articuno.png
    First of all, I used this video to get me through. I needed Strength (Snorlax) and Surf (Lapras) to find it.
    Articuno (Level 50) had to be lowered, like Zapdos before it. Articuno was far more offensive, being able to OHKO members of my Team. It took a few tries to catch it. First I would Paralyze using Jolteon, then whittle it down. Snorlax was able to stall it out, allowing me to catch it after quite a few Ultra Balls. Hopefully Moltres won't be a problem (or too much of one) when I reach it.
    In the next Log, we will be going after Giovanni for our last Badge. Until the next time, we will see you!
     
    Back
    Top Bottom